Showing posts with label Pictorial. Show all posts

September 08, 2012

ExpoCycle Canada 2012

     Today was the public access day for ExpoCycle. It was held at the Direct Energy Centre on CNE grounds and featured a large number of distributors showing off products for the 2013 season. Here are some of the products I got to see today:

Helmets

Giro Air Attack available in spring 2013. It was very light and looked kind of cool. I'd like one painted in a Judge Dredd helmet scheme.

Wall of Catlike helmets

Catlike Whisper Plus (on left) and Chrono (on right)


Interior structure of the helmet
 Wheels

ENVE wheels. Handmade in the USA. They also had some cool road forks (some equipped for road bikes with disk brakes!)

Lightweight wheels

Cole wheels
Contact Points

Cinelli Ram integrated handlebars and full carbon saddle.

Prologo saddles
Clothing

Absolutely awesome Sugoi jerseys! If anybody I know is looking at this these are an awesome gift idea lol.
Miscelaneous

Arundel bottle cages, Bonk Breaker energy bars and K-Edge stuff

Lezyne tools for pumping your tires

Pretty Lezyne tools

Prototype Yakima fork mount bike rack that matches the Whispbar

Dura-Ace 9000 11 Speed

Dura-Ace 9000 cassette
Bikes

Storck with Xentis wheelset

Stunning frames from Stage Race distributing. The same owner also owns Blacksmith Cycles on Queen St W.

More from Stage Race

Van Dessel frame

Merckx frames

EMX-3

Merckx headtube badge

Ridley Noah

Masi Evoluzione bikes

Felt

Surly Pugsley. The large volume wheels allow you to ride through some normally unrideable terrain line sand and mud

Surly Troll all packed up and ready to go

Time NXRS. Love the angles

Marin Stelvio

Look 595 frames

Canada themed Look 695 Premium Collection

A Look frame that I can't identify but it had a crazy integrated stem.
Update: Big thanks to markie for identifying the frame as the 675!

Closer look at the integrated stem

Brodie road bikes from Vancouver. I had a nice talk with one of the reps and the bikes seem like a good deal.

My favourite bike of the show. The Masi Gran Criterium was a great looking steel frame. A bit expensive at over $2000 for a 105 equipped bike though.

Closer look at the Gran Criterium downtube
     Overall ExpoCycle was a worthwhile trip. I got to see some of the products and trends making it to the stores over the coming year. The big trend in bikes seems to be towards electronic shifting, mat paint jobs and high prices.

July 25, 2012

July 21, 2012

80's BC Rich Bich And Guitar Refinishing

     Two guitar posts in a row! What am I thinking?
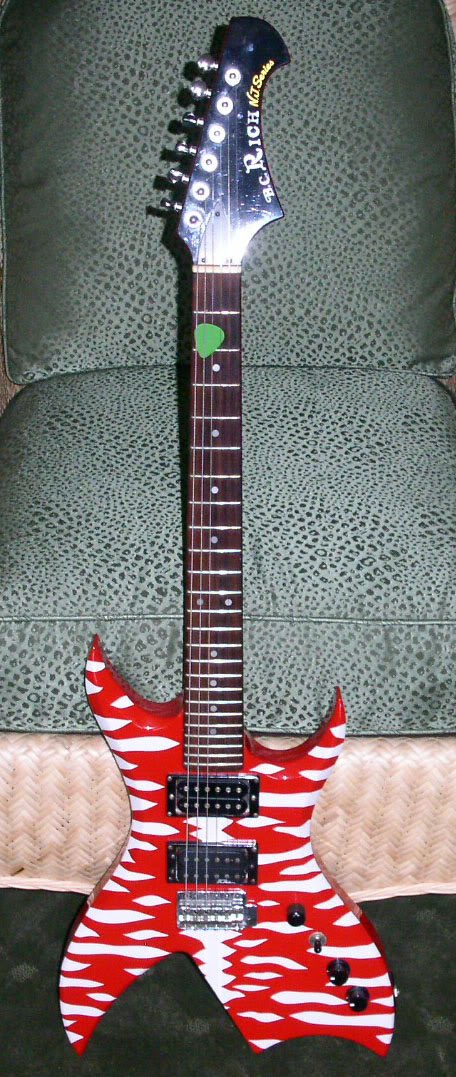
     This NJ Series BC Rich Bich was my first electric guitar and for that reason alone I'll never sell it. However, that doesn't mean that I won't mod the hell out of it. I liked the way the guitar played, the funky bastardised strat headstock, and the wacky body but I was never a fan of the lipstick red colour. I originally tried to change the appearance of the Bich by using electrical tape. I applied black and white tape in a Van Halen style but the tape started to peel off after a while where my hand would rest.


     My next design was a white tiger stripe but once again it didn't stick for very long.


     So... about a decade ago I decided to do a complete body refinish. I dismantled the guitar, purchased some chemical paint stripper and several different grits of sandpaper. I tried to use the paint stripper in the garage but it wouldn't eat through whatever BC Rich used to coat the paint. I was forced to take the body into the backyard and start sanding away.


     It was some HARD work (two or three evenings) as the sandpaper didn't even want to go through the paint but I eventually got it done. I was expecting the body to be made of several pieces of wood but was pleasantly surprised when it turned out to be a fairly nice single slab.


     Once sanded and completely smooth I attached a plank of wood to the neck pocket (using the existing screw holes) so the guitar would be easy to handle. I picked up some walnut coloured stain from Home Depot and applied it according to instructions. I used a think layer on the front and back and went much thicker on the bevels and sides.


     After the guitar was stained to my satisfaction I taped off the pickup cavities and neck pocket then used spray lacquer to seal and protect the body. It took about eight thin coats to get it where I wanted it.


    I then installed some GFS Power Rails humbuckers, the rest of the original wiring and some chicken head knobs on the controlls.

     I don't use the guitar often because I prefer many of my other guitars and the Power Rails are a bit more overdriven and darker than I prefer but I am very happy with the way the refinishing project came out. I give the guitar itself a 6/10 but the refinishing that I did a 9/10.


May 09, 2012

Die Trimming

     This is part 3 of my dental tech tutorials. After the impression has been poured, and the model made you need to trim the dies so you can start making the restoration.

When trimming dies it is always a good idea to use a well lit station and to have some sort of magnification. I use a simple loop.


To trim the dies first reduce the bulk of the stone cervical to the preparation using a carbide bur. Always trim from below the margin coming up towards the margin with the round end of the bur. This will help to prevent chipping.


Once you have done as much as you can with the carbide move onto a smaller round or egg shaped bur to finish the trimming around the margin.


Remove any draws, pulls or other imperfections which may have been present in the impression with a small pointed bur. These are some examples from other models.


Fill any bubbles or undercuts on the die/margin with undercut wax.


Mark the margin of the preparation with a sharpened red pencil. When marking the margin make sure to rotate the pencil as you draw the line. A sharp margin will score a pencil crayon and create a groove which will straddle a margin rather than mark it. To smooth out the pencil again simply rub and spin the point on a piece of paper.


Apply die hardener to the margin as well as round 2mm above and below the margin. Use 2 coats.


Apply die spacer to the rest of the die about 1.5-2mm occlusal to the margin. To apply the spacer shake the spacer bottle vigorously to mix the die spacer within then when it is ready you can work from the spacer that will be in the lid of the bottle. Dip your brush in the spacer then apply as a bead along the the base of the die then pull the bead upwards towards the occlusal. If the spacer is thick one coat will do. If it is thin two coats may be necessary.


The dies are now ready to be waxed up.