Since you made it up the hill you might as well get the tips for going back down!

Showing posts with label Instructions. Show all posts
Showing posts with label Instructions. Show all posts
March 31, 2013
How To Climb Like A Pro
Now that the weather looks like it's getting better. Here are some tips for getting that bike up the hills!
Since you made it up the hill you might as well get the tips for going back down!
Since you made it up the hill you might as well get the tips for going back down!
May 09, 2012
Die Trimming
This is part 3 of my dental tech tutorials. After the impression has been poured, and the model made you need to trim the dies so you can start making the restoration.
When trimming dies it is always a good idea to use a well lit station and to have some sort of magnification. I use a simple loop.

To trim the dies first reduce the bulk of the stone cervical to the preparation using a carbide bur. Always trim from below the margin coming up towards the margin with the round end of the bur. This will help to prevent chipping.


Once you have done as much as you can with the carbide move onto a smaller round or egg shaped bur to finish the trimming around the margin.


Remove any draws, pulls or other imperfections which may have been present in the impression with a small pointed bur. These are some examples from other models.


Fill any bubbles or undercuts on the die/margin with undercut wax.


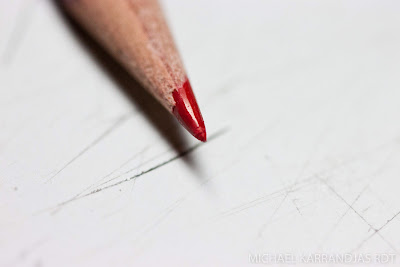
Mark the margin of the preparation with a sharpened red pencil. When marking the margin make sure to rotate the pencil as you draw the line. A sharp margin will score a pencil crayon and create a groove which will straddle a margin rather than mark it. To smooth out the pencil again simply rub and spin the point on a piece of paper.


Apply die hardener to the margin as well as round 2mm above and below the margin. Use 2 coats.


Apply die spacer to the rest of the die about 1.5-2mm occlusal to the margin. To apply the spacer shake the spacer bottle vigorously to mix the die spacer within then when it is ready you can work from the spacer that will be in the lid of the bottle. Dip your brush in the spacer then apply as a bead along the the base of the die then pull the bead upwards towards the occlusal. If the spacer is thick one coat will do. If it is thin two coats may be necessary.


The dies are now ready to be waxed up.

When trimming dies it is always a good idea to use a well lit station and to have some sort of magnification. I use a simple loop.


April 15, 2012
Dental Lab Model Fabrication
In this demonstration I will be showing how to fabricate the working lab models from the die stone that was poured in the post from April 5th. There are many ways to fabricate a working model but I will just be illustrating how it is done at my lab.
Model Fabrication
The first step is to separate the die stone model that was poured from the dental impression. Slide a knife between the stone and the tray edge and twist the blade to release the model. It is best to hold the stone in your hand and have the tray pointing upwards. That way, if the impression were to suddenly release it would be the tray to fly across the room and not your model.


Inspect the poured model for any flaws such as bubbles. This looks ok.


Once separated, trim the base of the model flat and level, and the facial of the model using a wet model trimmer. Use eye protection.

After trimming, allow the model to dry a little. If you need to work fast simply spray the model with a compressed air hose to speed the drying process. Trim the lingual portion of the model with an arch trimmer if you have one. If not, you can use a handpiece. Do not create any undercuts on the model when trimming or it will be extremely difficult to separate from the base that will be poured later.


Drill pin holes in the base of the die stone models so you can independently section the dies later on. One pin per abutment, pontic, and any other portions that will need to be removable to facilitate working on the case. Blow out the dust from the drilled hole with some compressed air.


Glue the brass pins into the holes. I use Krazy Glue Original because it bonds the stone and pin well and it flows easily. I apply a drop of glue to the pin threads then insert the pin into the drilled hole with the flat portion of the pin facing distally. Having the flat portion face the same direction each time makes placement of the dies back into the base easier where there are multiple units on one model. I also attach a rubber sleeve to the base of each pin which I will explain later.


Apply a stone separator to the die model using a brush. We use Super-Sep.

Allow the separator to dry a little, then you can pour a base for the die stone. Mix some Hydrocal 105 in a rubber bowl and pour into a base former until it is full. Vibrate the base former to remove any trapped air bubbles. Invert your die stone model so the pins are facing up and using an action like you were cleaning off the spatula apply yellow stone to the base of the model around the pins. Once the base is completely covered give the wet stone a little bit of a tap with your spatula to remove any air bubbles and ensure that it is smooth against the base of the model. place the die stone model into the base former that is filled with yellow stone and give the whole thing a couple of taps against the counter top to once again eliminate any air bubbles which may have been trapped. Allow the stone to harden for at least half an hour.


Once solid you can remove the model from the base former. Using the wet model trimmer, trim the base around the facial and flat at the posterior. Trim the base of the model to expose the brass pins and rubber ends. Let it all dry again.


After the model has dried somewhat, it is ready to be cut. Use a fine blade saw to cut the model. As I already stated, each die must be individually removable for working. If it makes it easier to cut out the dies, you can cut the model in half and remove the non working side before making the die cuts. Do NOT cut the margins or contacts off or you will have to start everything over again.


Remove the sectioned portions by pushing on the exposed pin bottoms at the base of the model. I use an old drill bit.

After all the segments have been removed clean up the base of the model with a sharp knife. Blow out any dust from the base with a air hose and be sure to use eye protection while doing that because tiny fragments of stone often fly towards your face at a high speed. Clean the die pieces with a brush. Do not brush the margins or contact areas because you may inadvertently chip or break the model.


Remove the black rubber prices from the bottom of the base and you can then replace all the die stone pieces. With the black rubber removed it creates an easy and clean looking access to the pin bottoms for easier removal of the dies.


Do a rough trim of the prepared dies around the margins to remove the bulk of the stone that will be removed during die preparation. I use the arch trimmer for this purpose.


Write the patient name or case number on the model so it can be identified and make sure you have poured the second pours of the models and you are done.

Subscribe to:
Posts (Atom)